Continuation
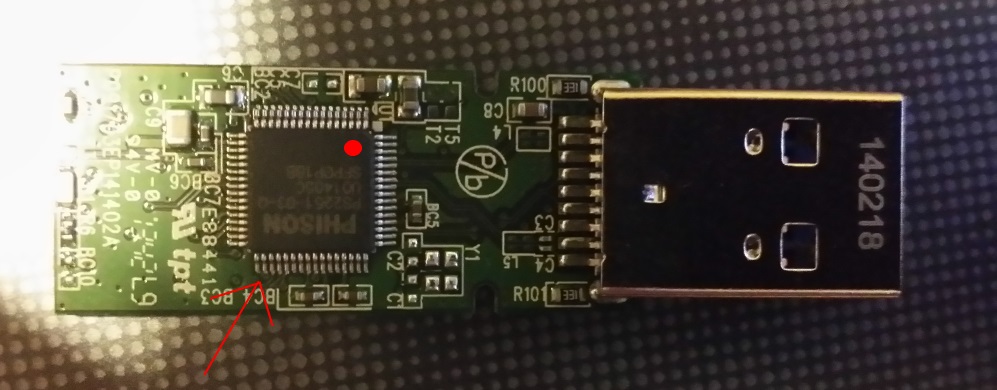
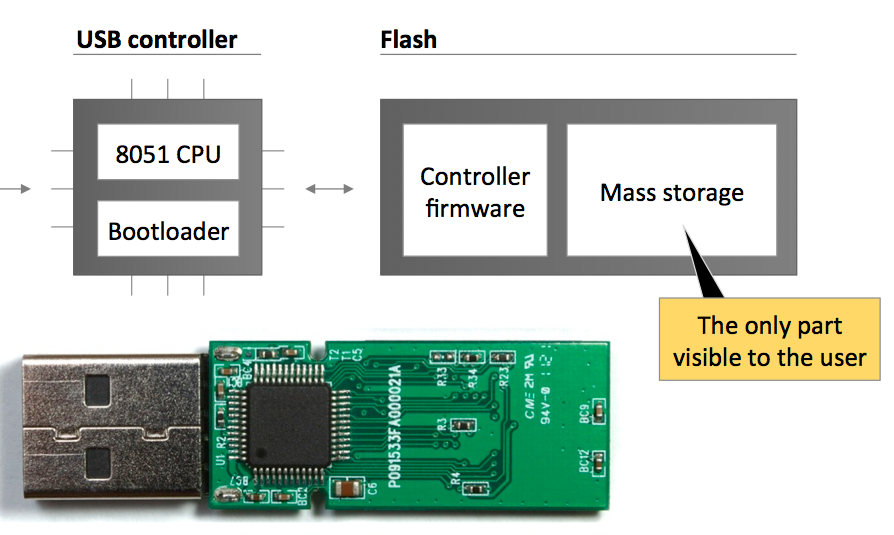
When connected, the USB device is registered, receives an address and sends its descriptor/descriptors to allow the OS to install the necessary drivers and send back the required configuration. After that, the host immediately starts working with the device. Once the work is completed, the device is de-registered. It is important to note that the devices may have several descriptors, they can also de-register and register as a different device. If you open the body of a USB flash drive, in addition to the mass storage visible to the user, there is a controller responsible for the above-described actions.
Bad USB or some history
At the last year’s Black Hat conference, two researchers (Karsten Nohl and Jakob Lell) shared their experience on how to install a personal upgrade to the firmware of the USB flash drive controller. After a while, this USB flash drive was registered as a keyboard and entered the selected commands. Due to the serious nature of the problem, the guys decided not to make the code for this available. However, soon after, two other researchers (Adam Caudill and Brandon Wilson) presented to the whole world at Derbycon conference an operable PoC tailored to Phison 2251-03 microcontroller The code is available at GitHub.
Transformation
As you might have guessed, today we will try to turn a regular USB flash drive into a pentester’s secret weapon! First of all, we will need a suitable device. As the code has been uploaded for the specific microcontroller only, we have two options — either find a USB flash drive managed by this controller, or perform some very challenging work researching and upgrading the firmware of another microcontroller. This time, we will select an easier way and try to find a suitable USB flash drive (here is the list of vulnerable equipment). The controller is quite popular, so, miraculously, I found a suitable USB flash drive among the dozen I have at home.
Starting the magic
Having found the suitable device (which we won’t miss if it fails), we can start its transformation. First of all, we need to download the sources which the guys made available. Actually, the content is described in detail on their official wiki page, but, just in case, I will remind you what they have uploaded to GitHub:
$ DriveCom — an app for communicating with Phison USB flash drives;
$ EmbedPayload — an app for embedding Rubber Ducky inject.bin key scripts into custom firmware for subsequent execution when the USB flash drive is connected;
$ Injector — an app that extracts addresses from the firmware and embeds the patching code in the firmware;
$ firmware — custom 8051 firmware written in C;
$ patch — collection of 8051 patches written in C.
INFO
When you use Ducky scripts, you should remember that the DELAY command, which performs a delay for a set number of milliseconds, will work a little differently on the USB flash drive than on Rubber Ducky, so you will have to adjust the delay time.
Preparing the system
Having downloaded the archive with sources from GitHub, you will find that most of them have been written in C# and require compilation, so you will need a studio. Another tool you will need is the Small Device C Compiler, or SDCC. Install it in C:\Program Files\SDCC, you will need it to compile firmware and patches. Having compiled all the tools contained in the archive, check again if this USB flash drive is suitable for firmware upgrade:
Command:
$ DriveCom.exe /drive=F /action=GetInfo
where F is the letter of the drive.
Getting the burner image
The next important step is to select an appropriate burner image (8051 binary file, responsible for dumping activities and uploading firmware to the device). They are typically named:
Command:
$ BNxxVyyyz.BIN
where xx is the controller version (for instance, for PS2251-03 it will be 03), yyy is version number (not important), and z reflects the memory page size and can look like:
$ 2KM — for 2K NAND chips;
$ M — for 8K NAND chips.
$ 4KM — for 4K NAND chips;
Dumping the original firmware
Before commencing your dirty experiments which could kill the USB flash drive, it is strongly recommended to dump the original firmware, so that if something goes wrong you can try to recover the device. First, switch the device to boot mode:
Command:
$ tools\DriveCom.exe /drive=F /action=SendFirmware /burner=BN03V104M.BIN /firmware=hid.bin
Then, use the DriveCom utility, passing the drive letter, the path to the burner image, and the path to the file where the original dumped firmware will be saved. It will look like this:
Command:$ tools\DriveCom.exe /drive=F /action=SendFirmware /burner=BN03V104M.BIN /firmware=hid.bin
Alternative options
In addition to using the HID nature of the USB flash drive and turning it into a keyboard which types our payloads, there are some other tricks that can be done. For instance, you can create a hidden partition on the device, decreasing the space seen by the OS. To do this, you will first need to determine the number of logical blocks on the device:
Command:
$ tools\DriveCom.exe /drive=E /action=GetNumLBAs
Then find the base.c file in the patch folder, uncomment the line #define FEATURE_EXPOSE_HIDDEN_PARTITION and add another directive — define, which sets a new LBA number: #define NUM_LBAS 0xE6C980UL (this number must be even, so if you got, say, 0xE6C981 at the previous step, you can decrease the number to 0xE6C940, for example). Having edited the sources, you need to place the firmware which you want to patch into the patch folder, name it fw.bin and run build.bat, which will create a modified fw.bin file in patch\bin\. You can now flash this to the USB flash drive. The options Password Patch and No Boot Mode Patch are done in the same way; you can read more about them on the project’s GitHub. My primary goal was to teach the USB flash drive to perform pre-set actions, which we have accomplished.
Result
We have reached our goal. Moreover, I hope you now understand that USB flash drives (and other USB devices) can no longer be seen simply as a drive that stores your information. In fact, it is almost a computer, which can be taught to execute specific tasks. Although, PoC has so far only been made available for a specific controller, you can be sure that, as you are reading this article, someone is definitely working on others. So, be careful when you plug in a USB device and keep your eyes open.